Implementing In-App purchases in your NativeScript application (Part 2)
In the previous part I’ve shown you how to create a small NativeScript application and add a simple purchase workflow using the nativescript-purchase plugin. Now it is time to wire things for iOS. In this part I will guide through adding the necessary settings on the Apple Developer portal and iTunes Connect, create some sandbox users and test your workflow.
Creating an App ID
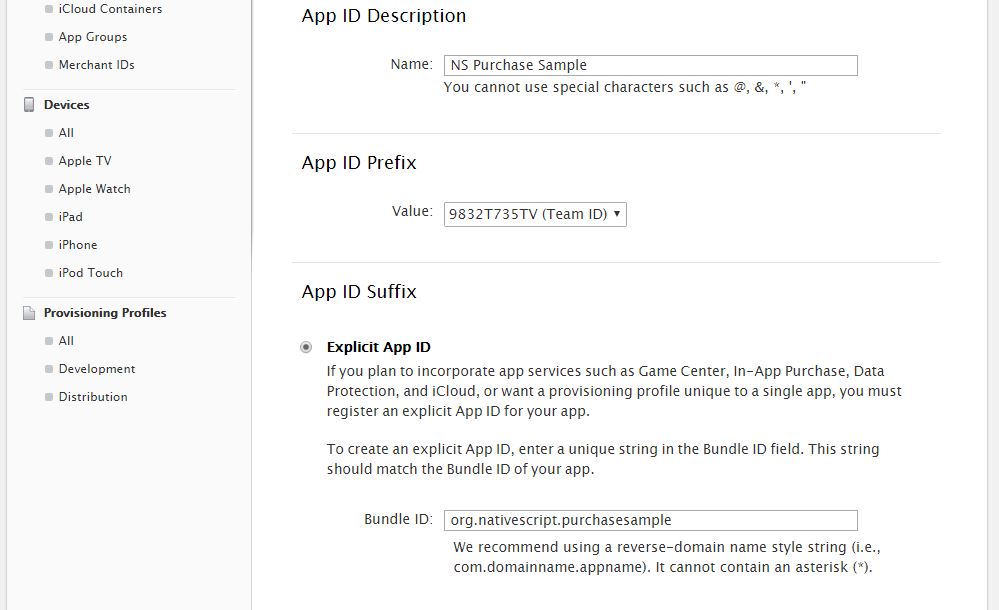
The first thing we need to do is register a new App ID in the Apple Developer portal. We do this in the “Certificates, IDs & Profiles” menu, then “App IDs” and click on the “plus” button on the top right. For the App ID, you can select whatever description you want. For the App ID Suffix you must select Explicit App ID and type exactly the name as it is present in the package.json file nativescript section the id attribute. In my case this is org.nativescript.purchasesample. And we need to use Explicit App ID, because wildcard App IDs do not support in-app purcahses.
Configuring iTunes Connect
Once we have the App ID set up we need to head over to iTunes Connect and add our application there. Note that even if you intend to do Sandbox testing only, you still need to register your app in iTunes Connect. You do not need to upload the app binary or wait for Apple’s approval, it just needs to be registered.
On the New App screen we select iOS and fill in the rest of the details. For Bundle ID make sure you select the bundle that we have just created.

NB: It can take up to couple of minutes for iTunes Connect to pick up your new App ID. So if you do not see it in the drop down, don’t worry, just wait 5-10 minutes and it should appear.
Once we have our App created we need to go the App settings screen Features -> In-App Purchases. This is where we will add our products.
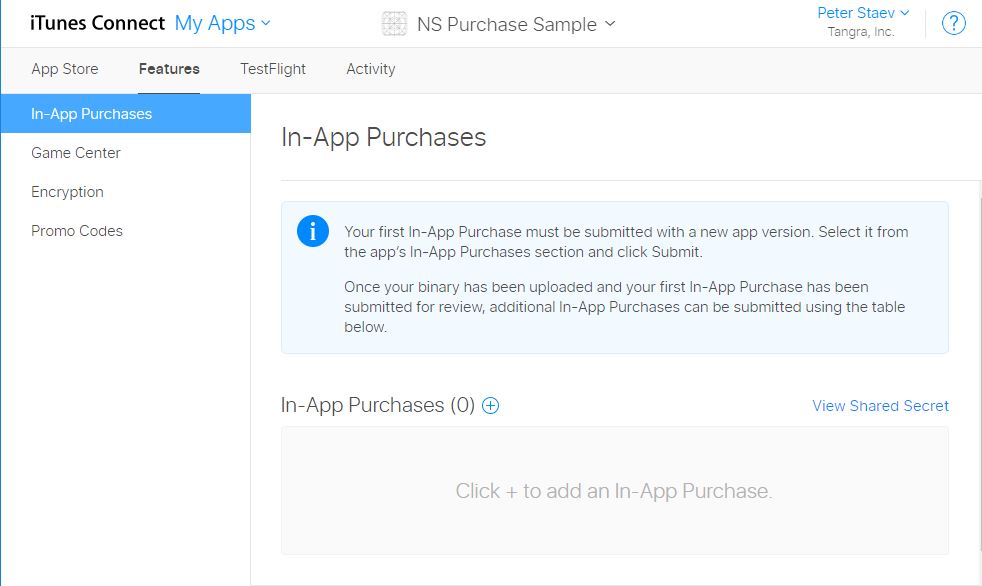
Since we are going to do Sandbox testing, you can safely ignore the Information about production products. When we press the plus button to add our first product we are presented with the following wizard that asks us what type of product we will add.
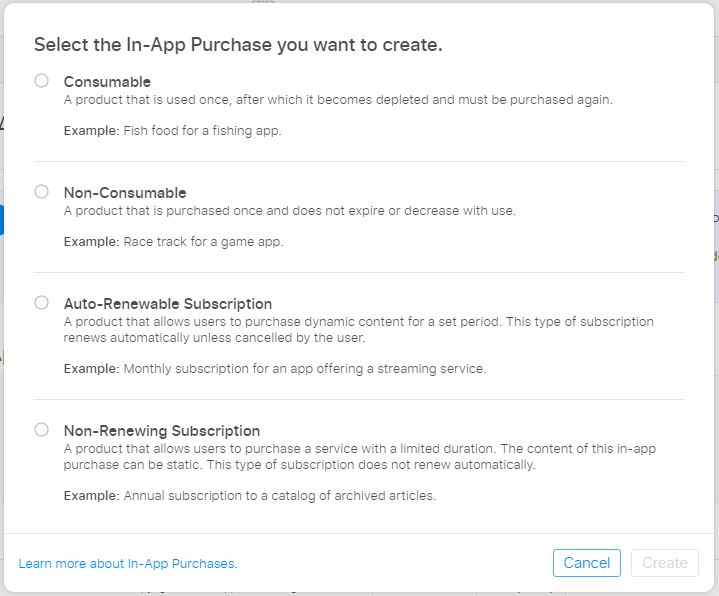
As of writing of this post the nativescript-purchase plugin supports only in-app purchases. So we will be working with the first 2 options. We will create one consumable and one non-consumable products.
We will start by adding a consumable product first. On the New In-App Purchase screen we go and enter the details for our product. When we created the application in the previous part of the tutorial we have said that our consumable product will be product2. So let’s fill in the details for that product:
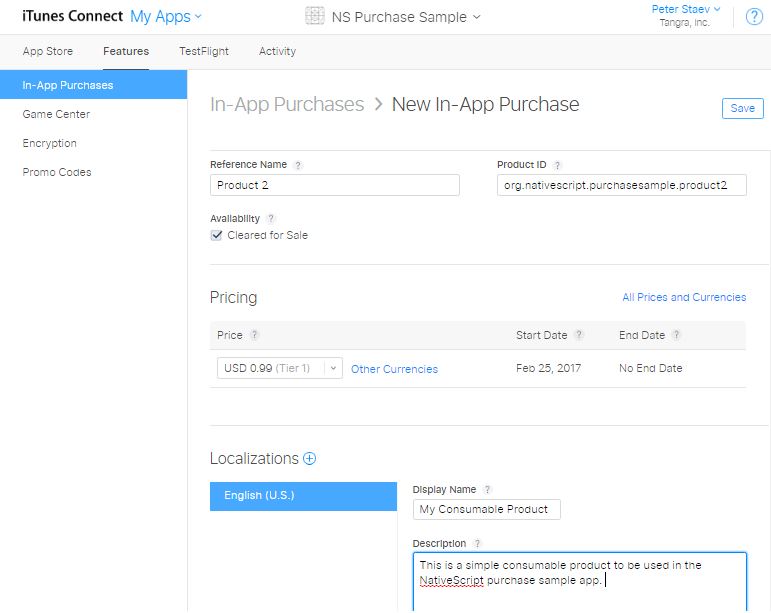
– Reference Name – You can use anything for this. This is not shown to the end user and is only for internal use.
– Product Id – This one is very important. You must use the same ID that we used in the init() method of the nativescript-purchase plugin. In our case (and in case you followed the naming from the first part) we should input here org.nativescript.purchasesample.product2.
– Pricing – You should select here the pricing tier for this product. You can chose from various ones and select the one that best suits your needs.
– Localization (Display Name and Description) – This is what the user will see when you list your products. You can add localized text for both by pressing the plus sign next to the Localization header.
Once we save Product 2 info, we have to go through the above procedure and add Product 1 as well. Note that Product 1 will be a non-consumable product, so make sure you select the second option in the add product popup.
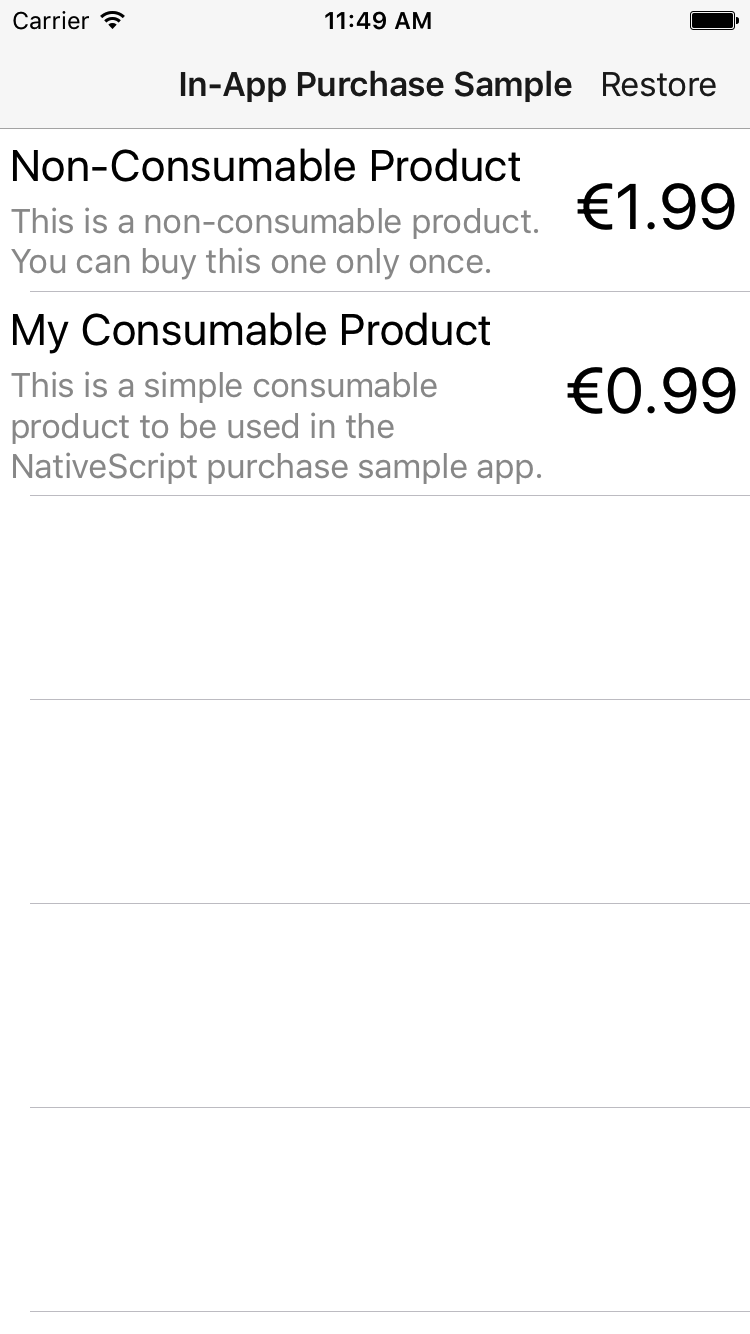
Now let’s return to our NativeScript project and run the app onto the simulator. If we did everything correctly we should see a nice list of products that we just added to iTunes Connect:
NB: You might NOT be able to see the registered products (consumable, non-consumable, etc.) if you do not have any contracts in effect regarding paid applications. To solve the problem, you can activate the contract for paid applications in App Store Connect > Contracts, Tax and Banking section.
Testing with Sandbox purchases
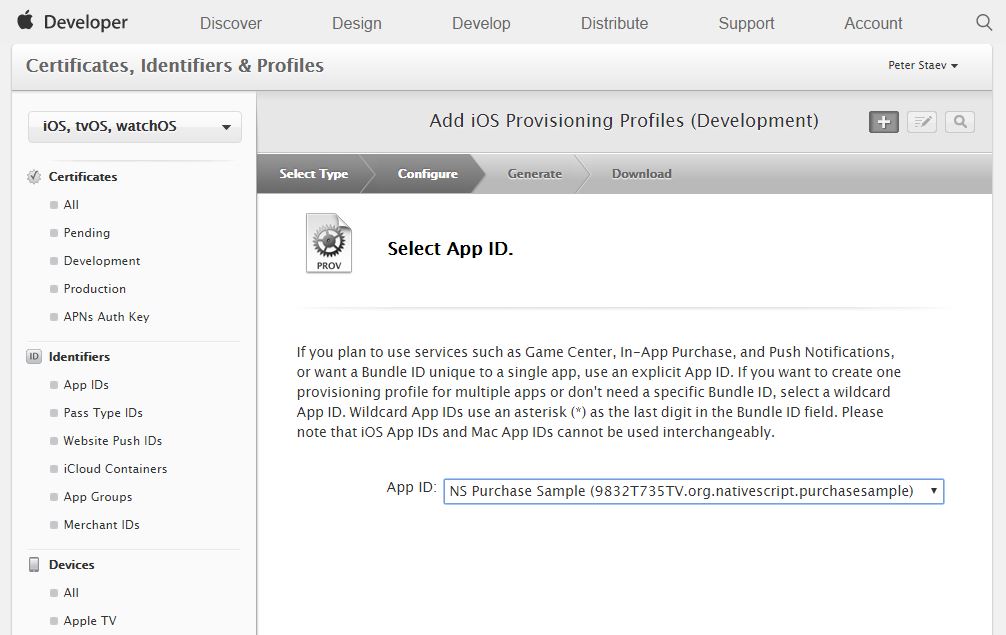
Now that we have the list ready it is time to do some sandbox purchases and test our purchase workflow. Before we start you must note the following: you cannot make sandbox (or real) purchases in the simulator! So in order to test we must deploy to a real device and in order to do this we first need to set up a provisioning profile. So lets get back to the Apple Developer portal and create a Development provisioning profile for the App ID we created at the start:
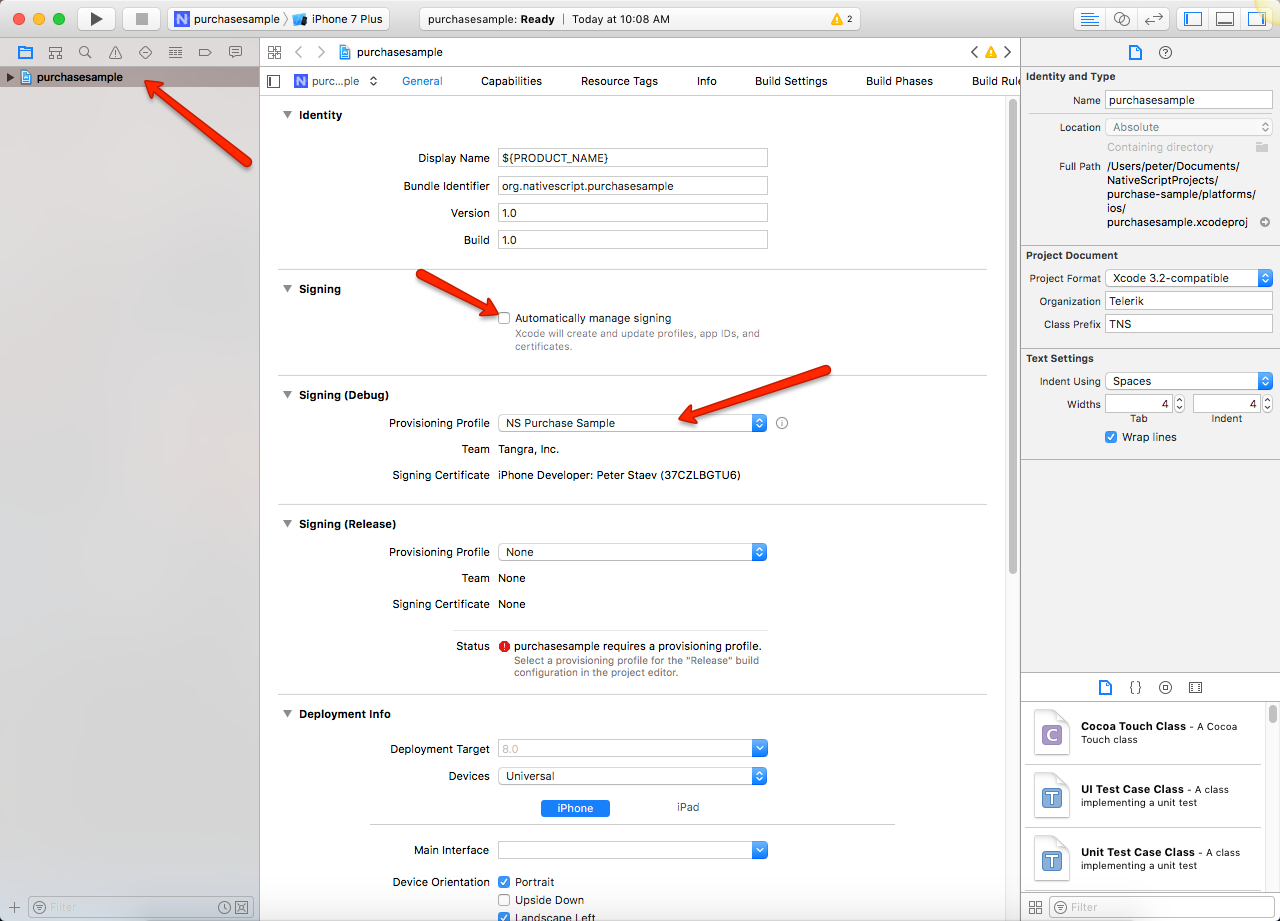
Once you generated the provision profile and download it locally it is time to assign it to our app. In order to do so first do a tns build ios in the terminal in order NativeScript to generate fully the platform specific files. Then in Finder navigate to the platforms/ios folder located under you project’s root folder and open the .xcodeproj file. This should bring up XCode. There click on your project in the left pane and then uncheck the “Automatically manage signing” box and then in the “Signing (Debug)” section import your downloaded provision profile.
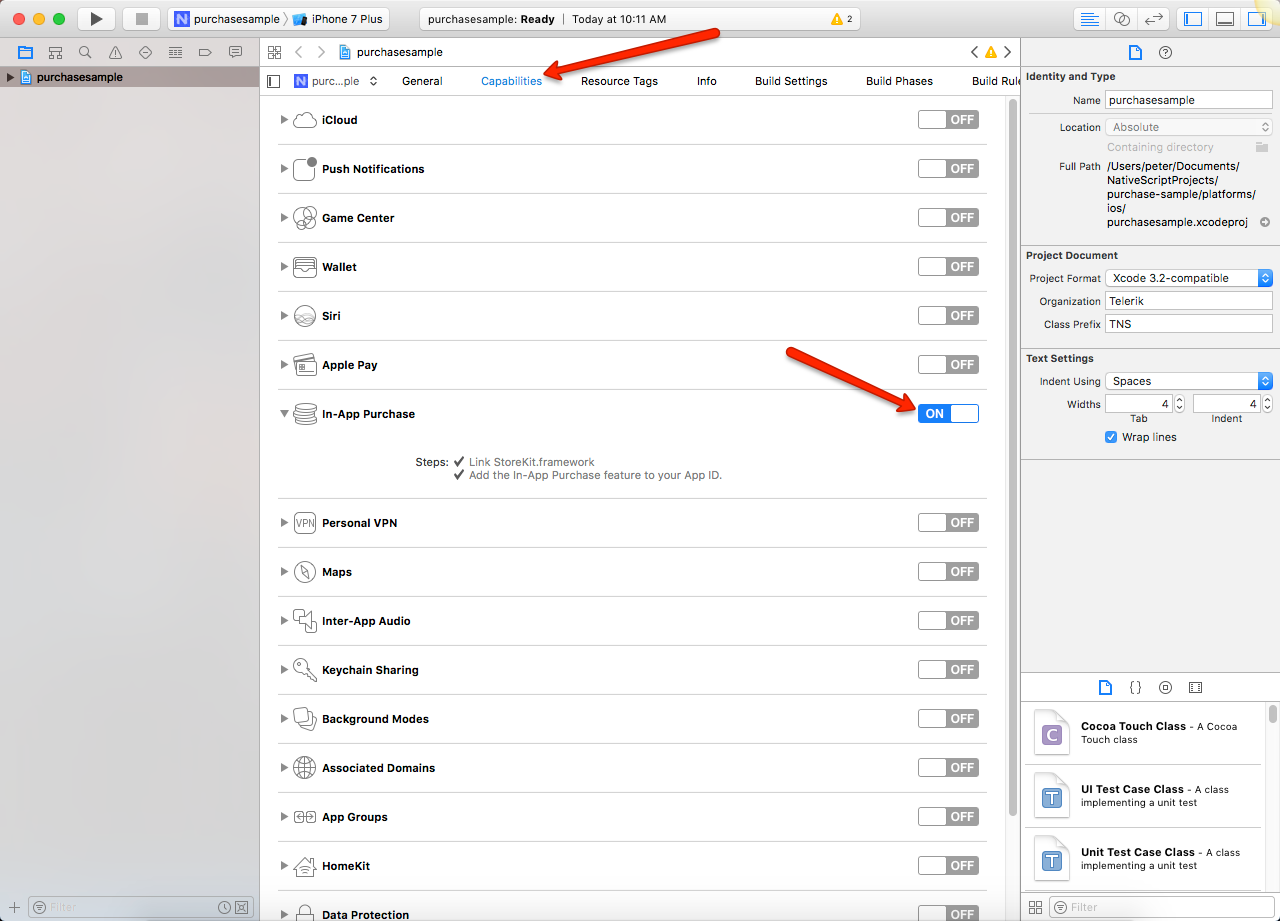
Do not close XCode yet as we still need to add the in-app purchase entitlement to the project. Go to the Capabilities section and turn on the In-App Purchase capability. Wait till all actions are complete and then you can close XCode.
Now we are ready to deploy the app to our real device. Attach your device and then use tns deploy ios to deploy to it. Once the app is deployed, open it and if everything is done correctly you should see the same list of products as in the simulator.
NB: You need to repeat the two XCode steps above every time you do tns platform clean ios on when you upgrade the NativeScript runtime to a new version. This is because those actions recreate the whole platforms/ios folder and its files.
The only thing left is to set up some sandbox users to test our purchases. Apple has a really nice step-by-step guide on how to add your sandbox users to your iTunes Connect account, so I will not go in much details here. The most important thing to remember is that you cannot use your actual Apple ID as a sandbox user. You must set up a new one.
Once you have added your sandbox users go to the App Store app on your device, scroll down to the bottom of the Featured page and tap on your Apple ID and select Sign Out. Do not try to sign in with the sandbox user to the App Store app as you will get an error. Instead go to the sample app we are developing and tap on a product. You will get a prompt asking you to sign in:
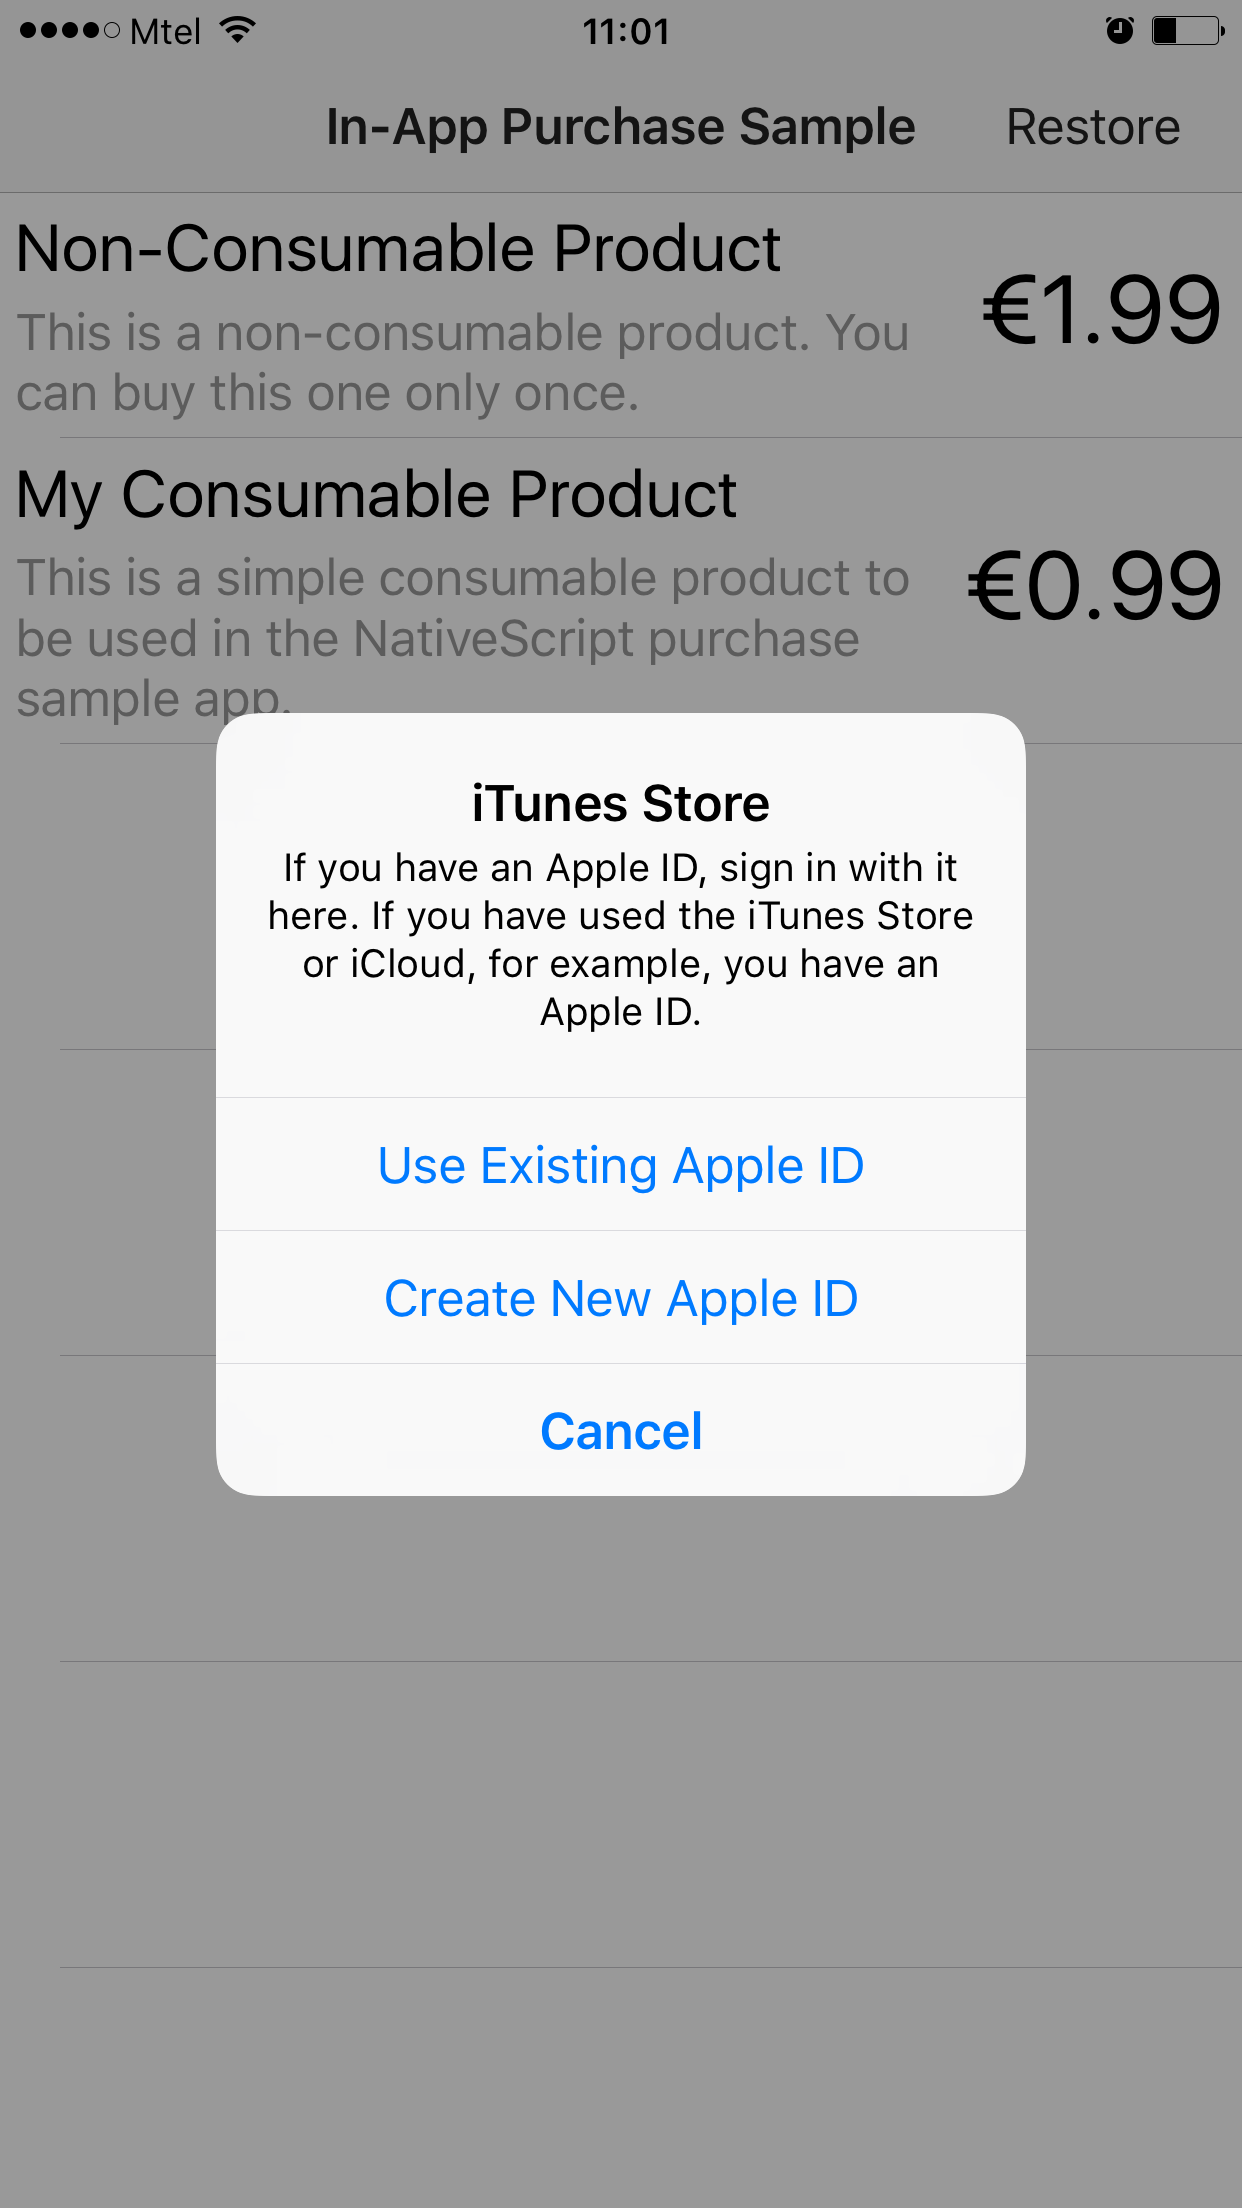
Tap on the Use Existing Apple ID option and enter your sandbox user credentials:
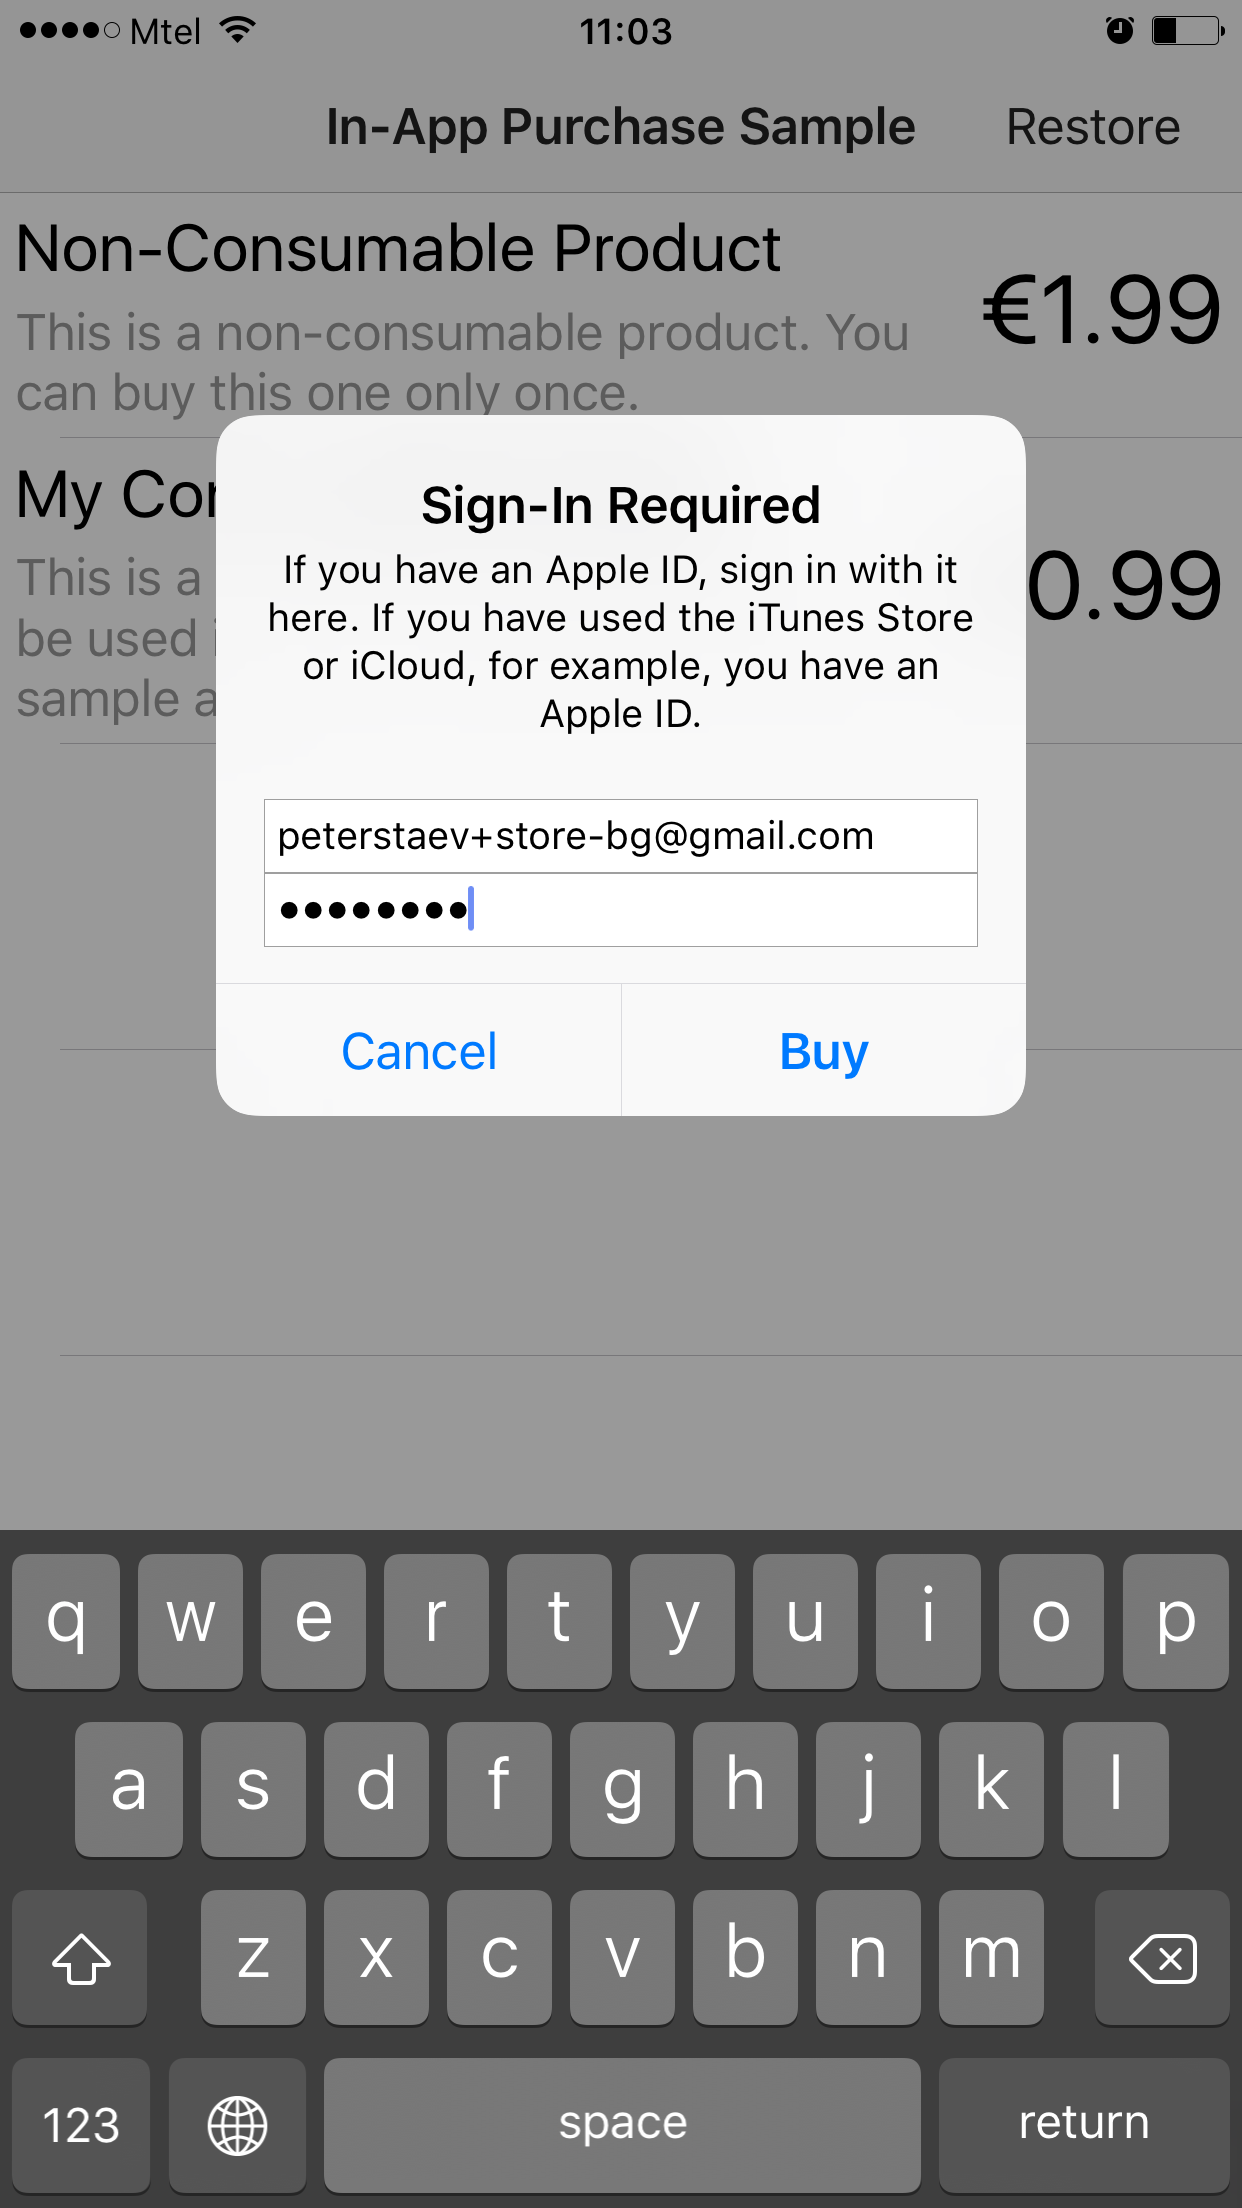
You will get a prompt to confirm your sandbox purchase:

Once you press Buy and wait for the purchase to complete you will get a prompt of the successful purchase:
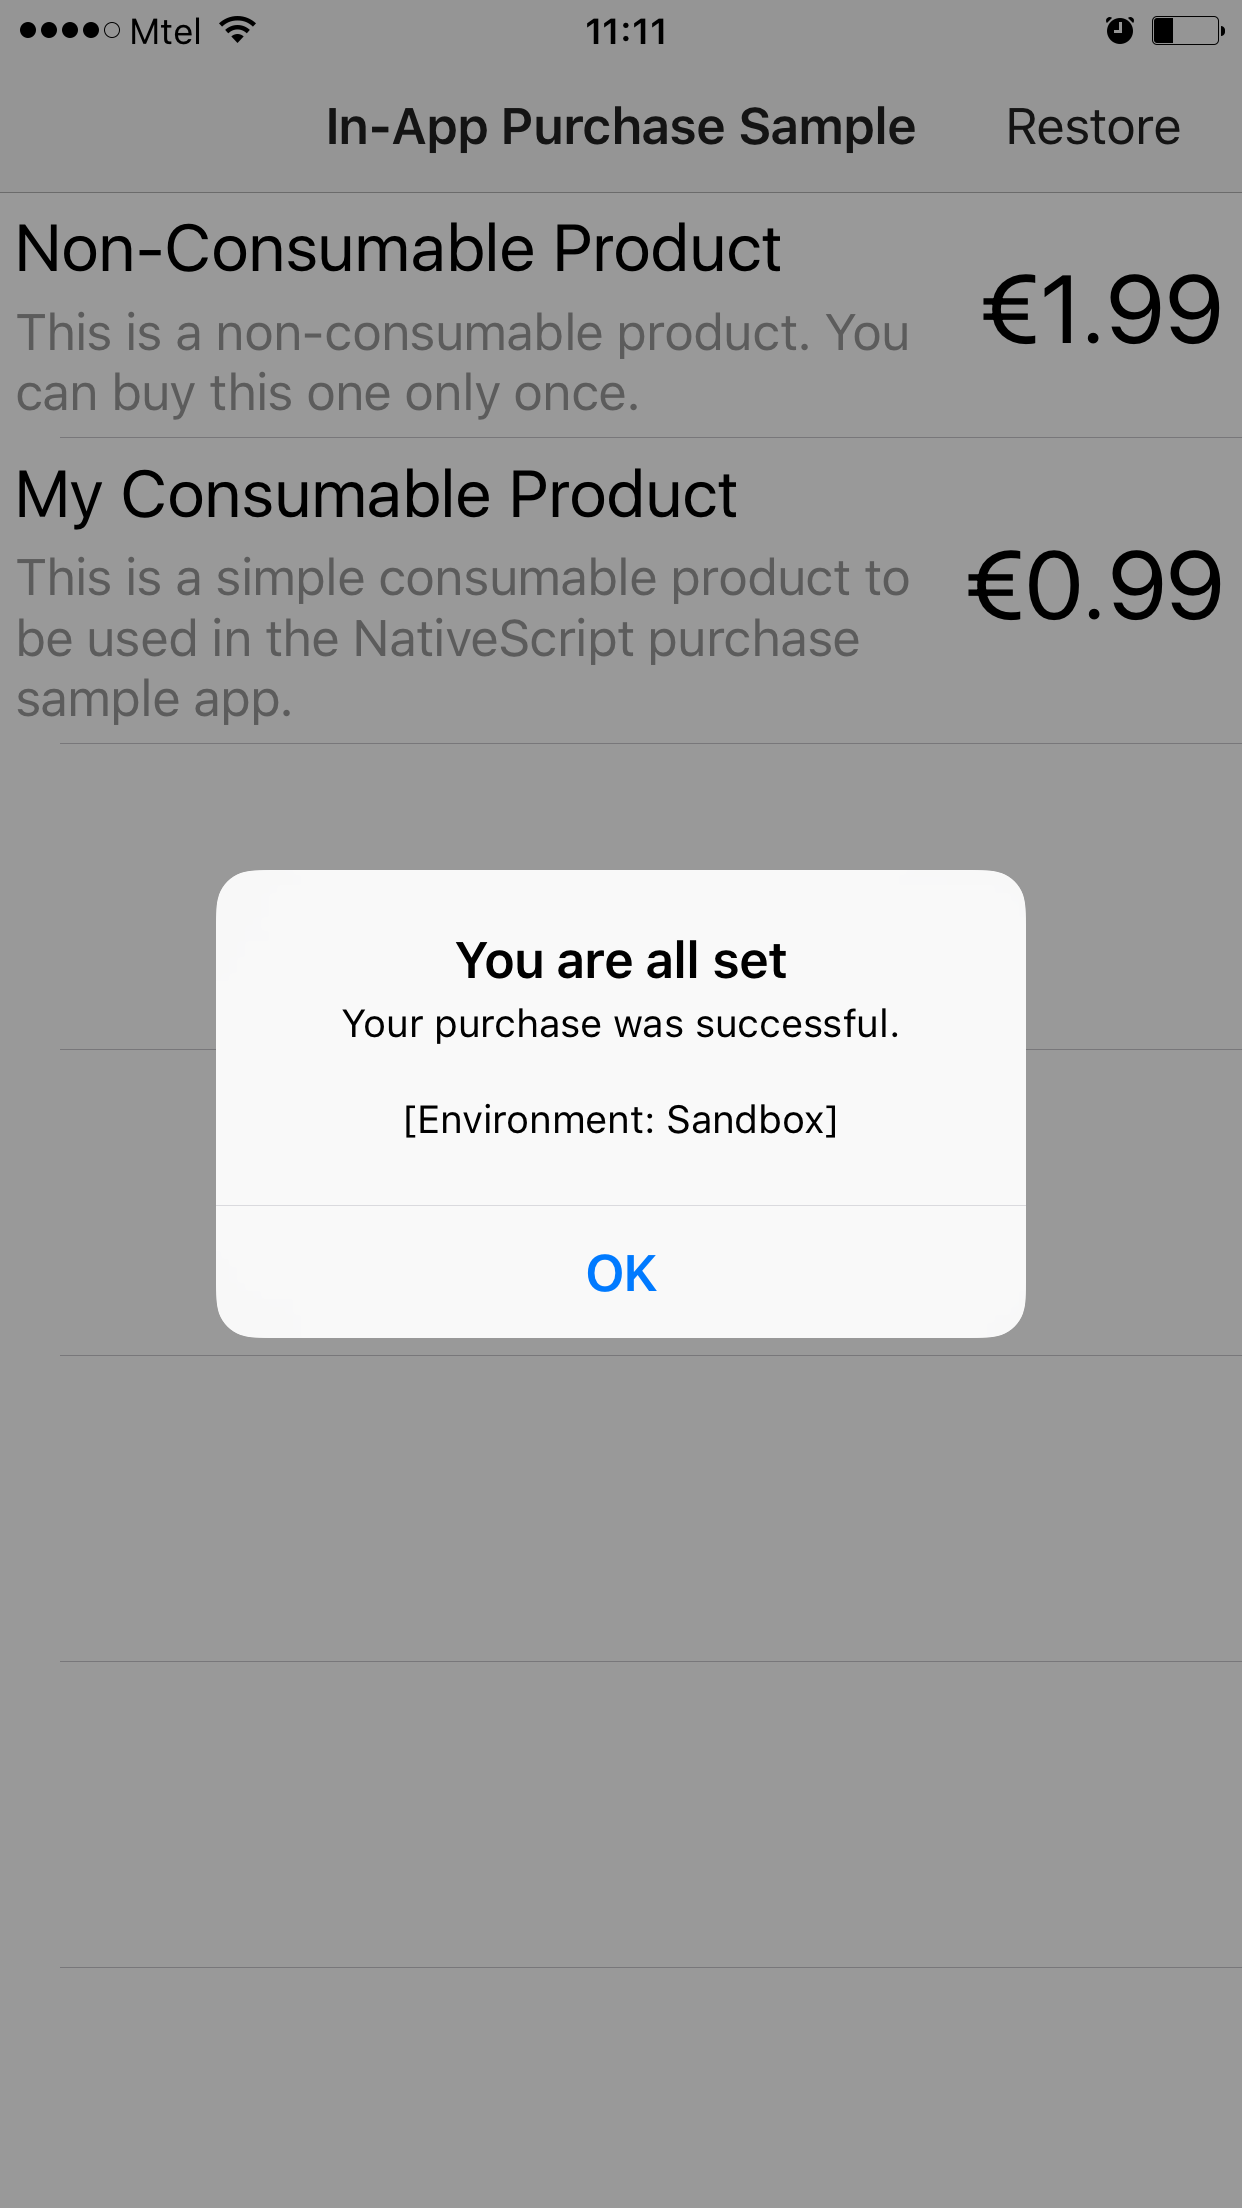
Congratulations you have just made your first sandbox purchase!
If you want to explore all the properties you can get from the nativescript-purchase plugin for the Product and Transaction you can add some console.logs to the purchase workflow methods we have added in the previous part of the tutorial. Attach your device to your Mac and then use tns run ios so you can see the logs in your terminal.
Coming up next
In the final part of this three part tutorial I will guide you through configuring things for Android on Google Play and making some sandbox purchases on Android.